
How to Check Boat Electrical Wiring Safely
- 2 days ago
- 7 min read
Why a Boat Electrical Wiring Check Could Save Your Life

The marine environment is uniquely hostile to electrical systems. Salt air, vibration, moisture, and heat attack connections constantly, turning a perfectly functional wiring run into a fire risk within a single season. Problems can hide under insulation for metres before revealing themselves as a tripped breaker, a dead instrument, or worse.
Key Takeaways
Over 50% of boat electrical failures stem from wiring issues rather than failed appliances
Always verify battery voltage is above 12.0V before troubleshooting individual circuits
Secure all batteries to limit movement to less than 25 mm (1 inch) under 40 kg (90 lbs) of force
Inspect shore power connections monthly to prevent micro-arcs and fire hazards
Schedule a professional inspection with our team via the contact page to ensure complete compliance with Australian standards
The reassuring truth is that a methodical approach finds most faults quickly. You do not need to be an electrician. You need a digital multimeter, a basic understanding of how 12V DC circuits work, and a repeatable process to follow from the battery outward.
I'm Kristen Kearns, founder of Luxury Marine, and with decades of experience captaining and managing vessels up to commercial survey level on Sydney Harbour, I have seen how a missed boat electrical wiring check can escalate from a nuisance fault into a major emergency. In this guide, I will walk you through exactly how to inspect your system safely and systematically.
A Systematic Guide to a Boat Electrical Wiring Check
A systematic troubleshooting process keeps you safe and saves hours of aimless wire-wiggling. When an electrical item stops working, we follow a strict diagnostic pathway. We start at the power source and trace the path of the current to the device.
To understand the scope of your onboard systems, we must differentiate between the two types of electricity on your boat. The table below outlines the key differences between marine DC and AC systems.
System Feature | 12V / 24V DC System | 230V AC Shore Power System |
Primary Source | Onboard battery banks | Dockside shore power pedestal or generator |
Common Uses | Bilge pumps, navigation lights, marine electronics | Air conditioning, water heaters, battery chargers |
Safety Risk | Low shock risk, high fire risk from short circuits | Lethal shock risk, high fire and stray-current risk |
Key Protection | Fuses, thermal circuit breakers | Residual Current Devices (RCDs), main breakers |
Before unscrewing panels, perform a complete visual inspection. Look for green powdery corrosion on copper terminals, loose crimps, and sagging wire runs.
Essential Pre-Check Steps: Switches and Battery Voltage
We always start our diagnostics by checking the simplest components first. Many frustrating "failures" turn out to be a switch left in the wrong position. Verify all four primary switches in the circuit: the main battery selector switch, the main DC distribution breaker, the individual circuit breaker, and the switch on the appliance itself.
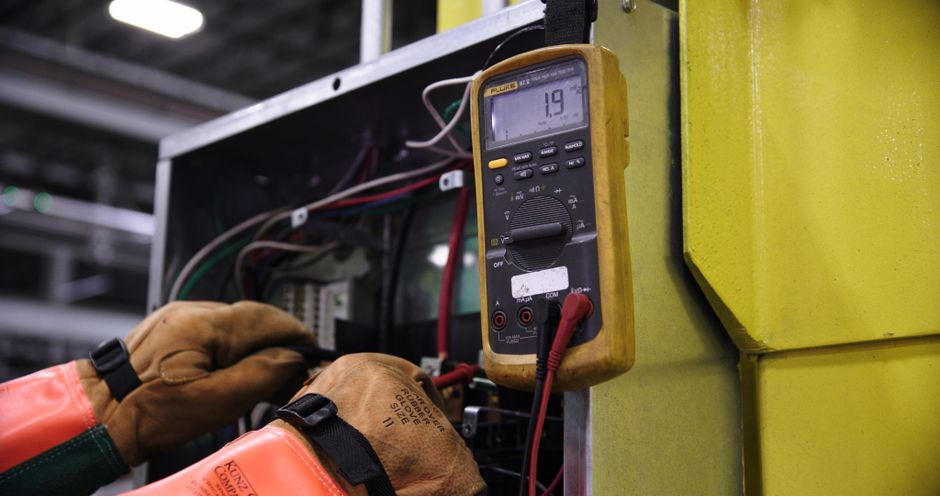
Next, measure the battery bank voltage using a digital multimeter. A healthy, fully charged 12V lead-acid battery bank must show an "at rest" voltage between 12.6V and 12.8V after sitting without a charge or load for 12 hours. If your battery voltage reads below 12.0V, the battery is heavily discharged, and many modern marine electronics will automatically shut down to protect themselves.
Never replace a blown fuse with one of a higher rating. Fuses protect the wiring, not the device. Installing an oversized fuse to stop it from tripping can overheat the wire, melt the insulation, and start a fire.
Tracing Power and Diagnosing Voltage Drop
If switches are on and the battery is healthy, we test whether power is actually reaching the non-functioning device. Disconnect the positive and negative power wires directly at the appliance. Set your multimeter to DC volts and place the probes on the bare wire ends.
A reading of 12.6V at the disconnected wire ends tells us the wiring path is intact. If the device still refuses to run when reconnected, the fault lies inside the appliance itself. A reading of 0V indicates an open circuit, which means a blown fuse, a broken wire, or a highly corroded connection exists somewhere along the run.
If you measure good voltage at the disconnected wires, but the voltage drops drastically when you connect and switch on the device, you are dealing with excessive voltage drop. This indicates high resistance in the circuit, usually caused by undersized wiring or corroded terminals.
To locate a break or high-resistance point on a long wire run, we use the halfway-point method. Find the physical midpoint of the wire run, often at a terminal block or junction. Test for voltage at this point. If you find good voltage, the fault lies between the midpoint and the appliance; if you find no voltage, the problem is between the battery and the midpoint. This simple technique instantly halves your search area.
Best Practices for a Boat Electrical Wiring Check
Preventing future wiring failures requires using the correct materials and installation techniques. Standard automotive wire or residential solid copper wire (such as Romex) has no place on a boat. Vibration will quickly crack solid copper wire, creating an arc hazard.
We only use multi-strand marine-grade tinned copper wire. The tin coating resists corrosion and prevents the copper from turning green and brittle.
Every connection must be mechanically strong and watertight. We use crimp-on ring terminals with adhesive-lined heat shrink tubing. The adhesive melts when heated, sealing the connection against salt air and moisture. Never use wing nuts on battery terminals because vibration will loosen them over time; always use stainless steel Nyloc nuts.
Secure all wiring runs at least every 45 cm (18 inches) using non-metallic cable supports to prevent sagging and chafe. Always incorporate a drip loop (a downward loop in the wire) just before the wire enters any device or connection block. This forces gravity to drip condensation off the wire before it reaches the terminal.
Safety Protocols for DC and AC Systems
Working on marine electrical systems requires strict adherence to safety protocols. While 12V DC systems rarely present a shock hazard, they can deliver massive currents. A shorted 12V battery can easily melt a wrench or start a fire. Always disconnect the main battery switch before working on DC wiring.
AC shore power systems (230V in Australia) present a lethal shock hazard to you and anyone in the water near your boat. Never attempt to troubleshoot AC wiring while the shore power cord is plugged in. Turn off the boat's main AC breaker, disconnect the shore power cord at both ends, and verify the system is dead before touching any connections.
Every AC circuit on your boat must have Residual Current Device (RCD) protection with a maximum trip sensitivity of 30 mA. Test your RCD quarterly by pressing the physical test button to ensure it trips instantly.
Verify that your shore power cord has its screw-on retaining ring intact. A loose plug can cause micro-arcs, which generate extreme heat and lead to fires. Additionally, ensure your inverter/charger case grounding wire is the same gauge as the DC positive feed wire to safely handle fault currents. You can review standard safety compliance baselines in the 46 CFR 183.340 | Cable and wiring requirements. | eCFR.io registry.
Routine Boat Electrical Wiring Check and Maintenance
Regular maintenance catches small issues before they become major failures. We recommend performing a visual boat electrical wiring check monthly.
Start at the batteries. Ensure they are secured in liquid-tight, acid-proof boxes. They must not move more than 25 mm (1 inch) in any direction when subjected to 40 kg (90 lbs) of force. Cover all positive terminals with rubber boots to prevent accidental shorts from dropped tools.
Check your bilge pump and float switch wiring carefully. Because these sit in the dampest part of the boat, their connections are highly vulnerable. The bilge pump must be wired directly to the battery through an inline fuse, bypassing the main battery switch so it can operate even when you leave the boat locked up.
Keep your battery charger and inverter in a cool, dry, well-ventilated area. Never mount a charger directly above lead-acid batteries, as the corrosive gases released during charging will quickly destroy the electronics.
Why Serious Yacht Owners Choose Luxury Marine
Maintaining a luxury motor yacht on Sydney Harbour requires specialised engineering expertise. At Luxury Marine, we provide premium concierge-style yacht management and maintenance services based in Balmain. Our team of qualified captains and marine engineers brings over 40 years of boutique experience to every vessel we manage.
We understand the complex regulatory environment in NSW. We ensure your vessel complies fully with Transport for NSW marine safety standards and passes rigorous marine surveys. Whether you need a comprehensive boat electrical wiring check, routine system diagnostics, or complete yacht management, we deliver unbiased, high-end support.
We take the stress out of yacht ownership by handling everything from mechanical servicing to electrical compliance. Our deep understanding of premium vessels ensures your yacht remains safe, reliable, and ready for your next cruise on the harbour.
Take the guesswork out of your vessel's safety. Contact our Balmain office today via our contact page to schedule a professional electrical inspection with our experienced engineering team.
FAQs
What are the most common causes of boat electrical failures?
Corrosion and loose connections cause more than half of all marine electrical issues. Saltwater environments accelerate oxidation on terminals, which increases resistance and leads to voltage drop or complete circuit failure. Regular inspections help identify these issues before they cause equipment damage.
How do I test if power is reaching a marine appliance?
Use a digital multimeter set to DC voltage to test the terminals directly at the device. Disconnect the appliance and measure the voltage across the positive and negative feed wires while the circuit is switched on. A reading close to battery voltage indicates the wiring is intact, pointing to an internal appliance failure.
What is the halfway-point method for troubleshooting boat wiring?
This diagnostic technique involves testing for voltage at the physical midpoint of a long wire run. If voltage is present at the midpoint, the fault lies between the midpoint and the appliance. If voltage is absent, the issue is located between the power source and the midpoint, which halves your search area.
Why do my boat lights dim when other electronics turn on?
Dimming lights indicate excessive voltage drop caused by high resistance in the circuit. This issue typically stems from corroded connections, loose terminals, or undersized wiring that cannot handle the current load. Upgrading the wire gauge or cleaning the connections resolves this issue.
How often should I perform a boat electrical wiring check?
Perform a basic visual inspection before every major voyage and a comprehensive check monthly during the boating season. A complete system survey should occur annually or before vessel lay-up. Regular checks prevent minor corrosion from turning into dangerous electrical fires.
Can I use standard automotive wire for my boat?
No, standard automotive wire is highly susceptible to rapid corrosion in marine environments. Marine-grade wire features tinned copper strands that resist moisture and oxidation. Using non-marine wire violates safety standards and increases fire risks.
When should I hire a professional marine electrician?
Hire a professional for any complex AC shore power issues, inverter installations, or lithium battery retrofits. Working on 240V AC systems carries lethal shock risks and requires certified expertise. Qualified professionals ensure compliance with Australian marine electrical standards.


Comments